How to Set Up a Hostinger Account Step-by-Step (2025 Discount Guide)


Do you want your website to be online today? you are in the right place, this guide walks you through the entire journey from creating a Hostinger account to connecting your domain, launching your site, setting up professional email, and even hosting multiple domains or a VPS later. It’s written like a friendly walkthrough, not a tech manual. By the end, you’ll have a clean checklist, working site, working email, and the confidence to grow.
What you’ll get from this tutorial
-
A 20% guaranteed discount on Hostinger plans (applied automatically, no promo code needed).
-
Step-by-step guide to setting up your Hostinger account from checkout to dashboard.
-
How to claim your free domain (or connect an existing one) during onboarding.
-
The three main ways to launch your site: WordPress, Hostinger Website Builder, or manual/blank upload.
-
How to get a free professional email address for your domain and set it up in webmail or Gmail/Outlook.
-
Clear instructions for pointing your domain (via nameservers or A records) so your site resolves correctly.
-
Tips to fix common issues (SSL not active yet, DNS propagation delays, email landing in spam).
-
Guidance on hosting multiple domains under one account.
-
How to scale up to Cloud Hosting or VPS later if your site grows.
-
A practical end-to-end checklist so by the end you’ll have:
-
A working website live on your domain.
-
A professional email address tied to your brand.
-
The confidence to manage DNS, add new sites, and upgrade hosting when needed.
-
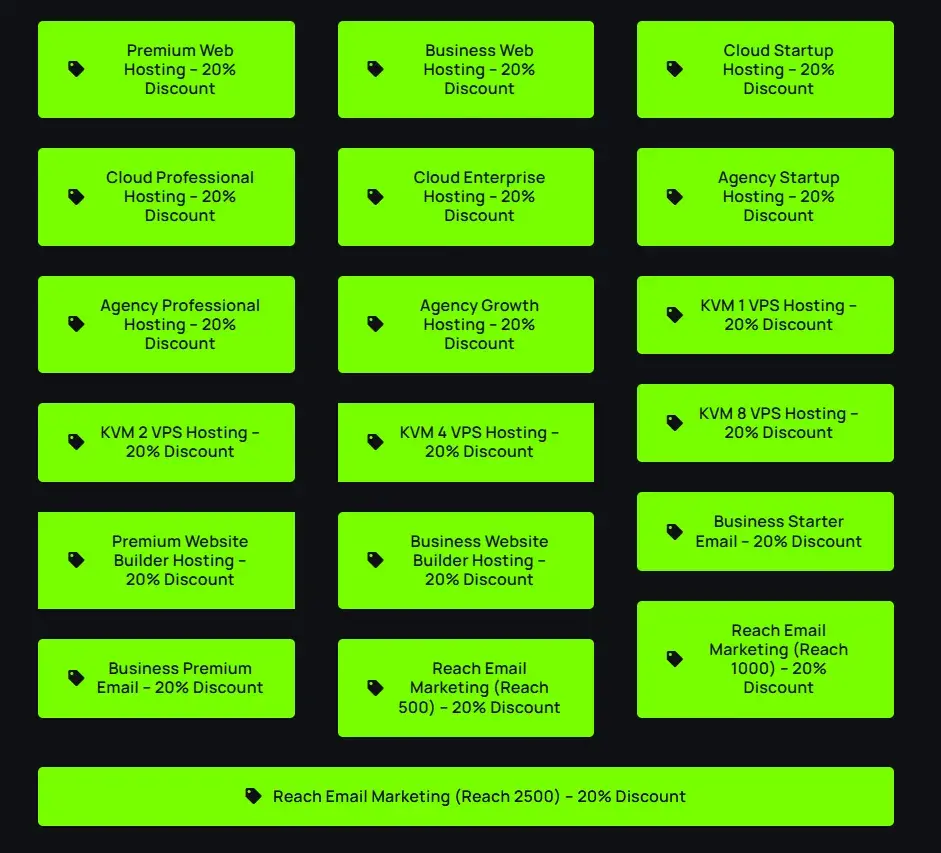
Discount
Use 20% Guaranteed Discount when you start. Click the button below to apply it during checkout then return here to continue with setup. (If you already purchased, you can still follow every step in this guide.)
How it works?
When you click one of these buttons, the discount is automatically applied, no promo code needed. The links are affiliate links, which means if you end up buying, I may earn a small commission at no extra cost to you. It helps keep guides like this free and up to date. Each button takes you straight to the hosting provider’s checkout page, so you can just pick the plan you want.
Here’s what will happen:
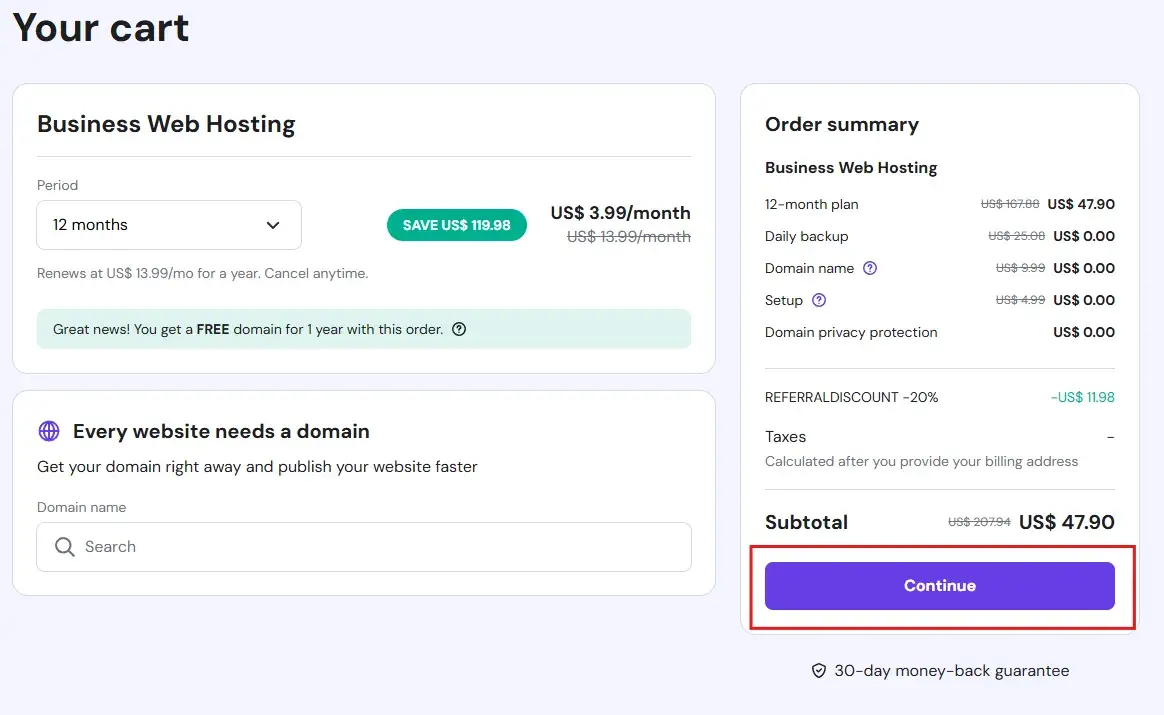
1. Click Any Button BELOW for the hosting plan you’re interested in (for example, i will choose Business Web Hosting).
2. You’ll be redirected to the provider’s cart with the discount already active you’ll see the lower price right away.
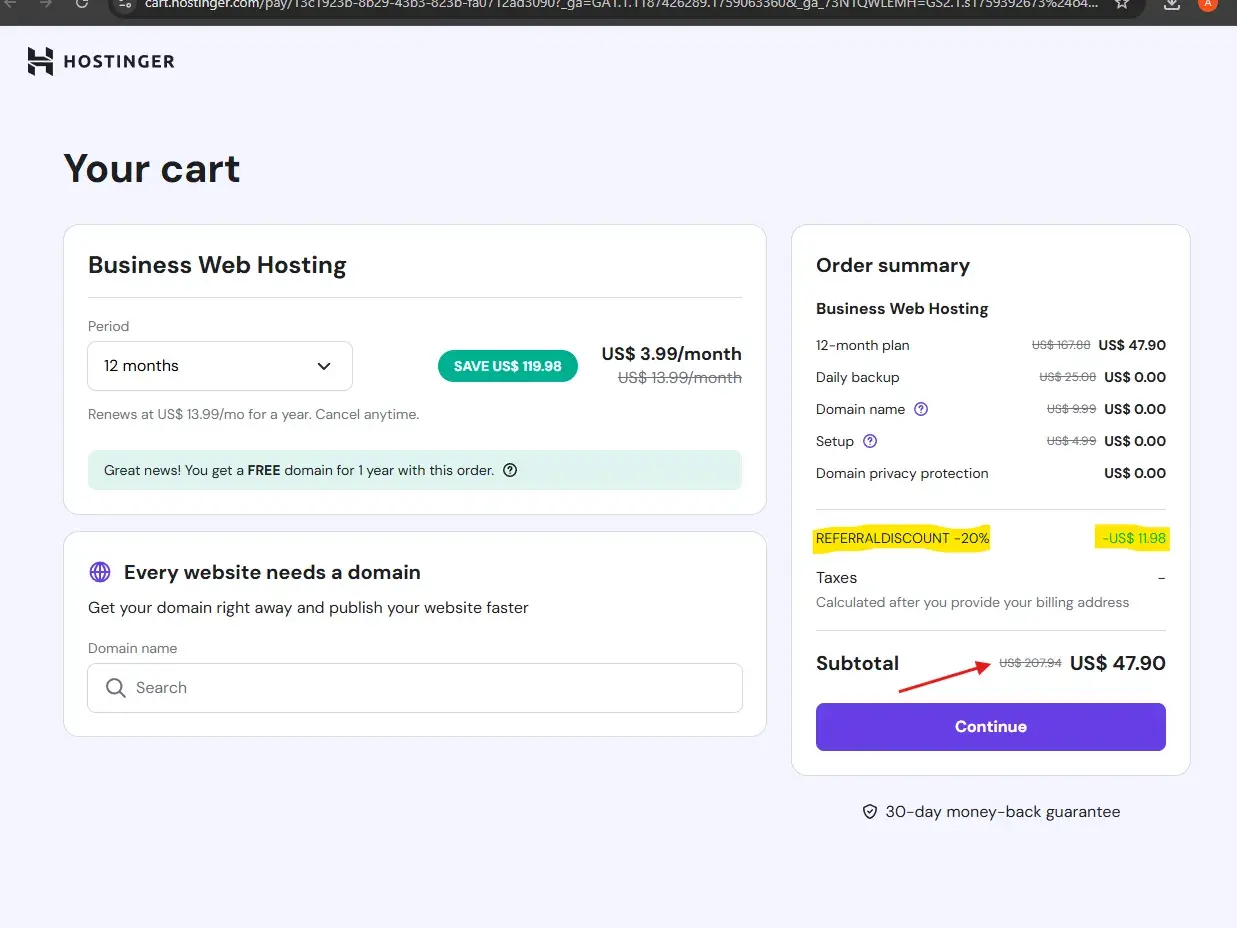
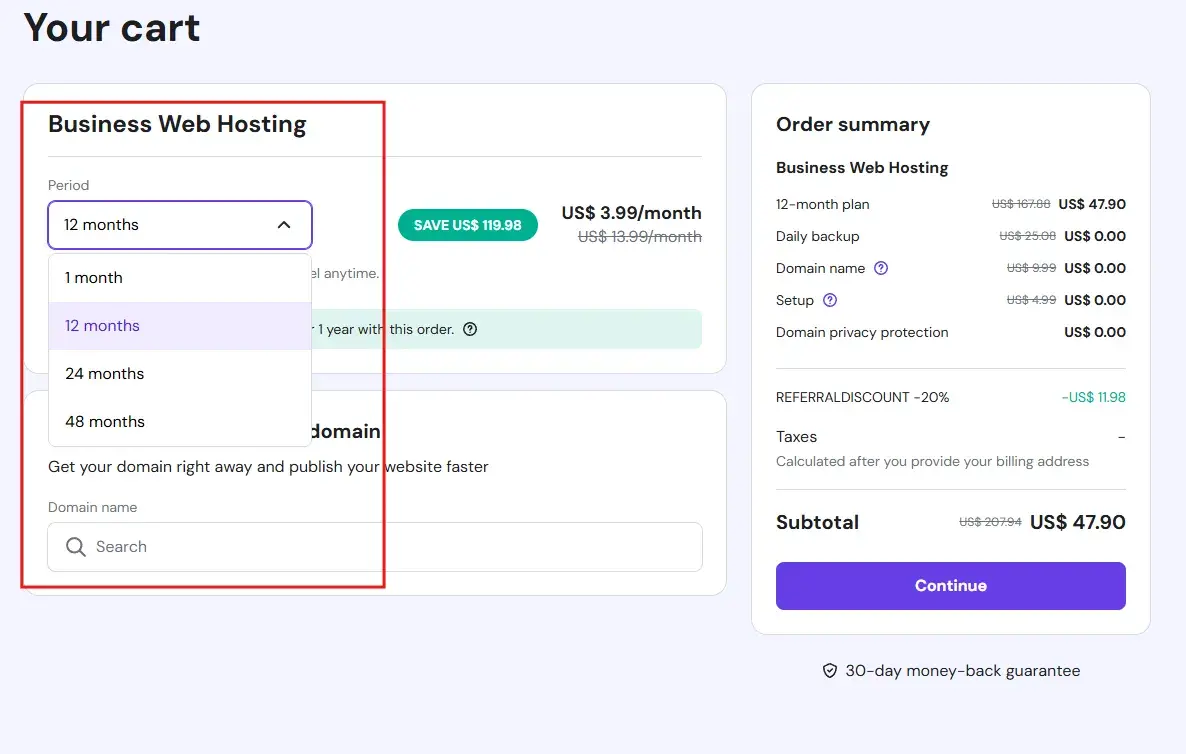
3. On the checkout page, choose the period (12 months, 24 months, etc.). The sale applies to all periods except the 1-month option on some plans.
4. Hit Continue.
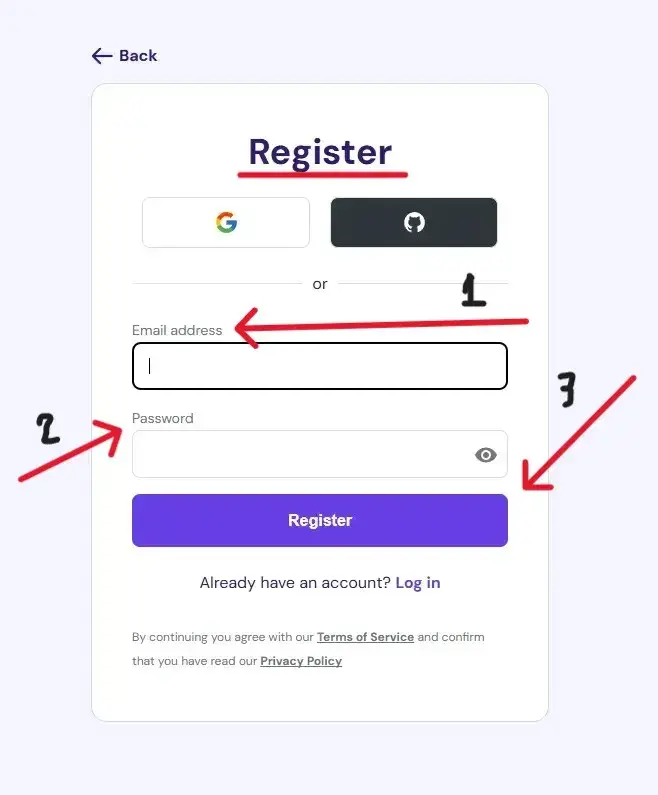
5. You’ll be asked to either log in (if you already have an account) or register (if you’re new).
5.1. To register, just enter your email address and create a password, then click Register.
6. Fill in your details (Billing and Payment) and complete the payment.
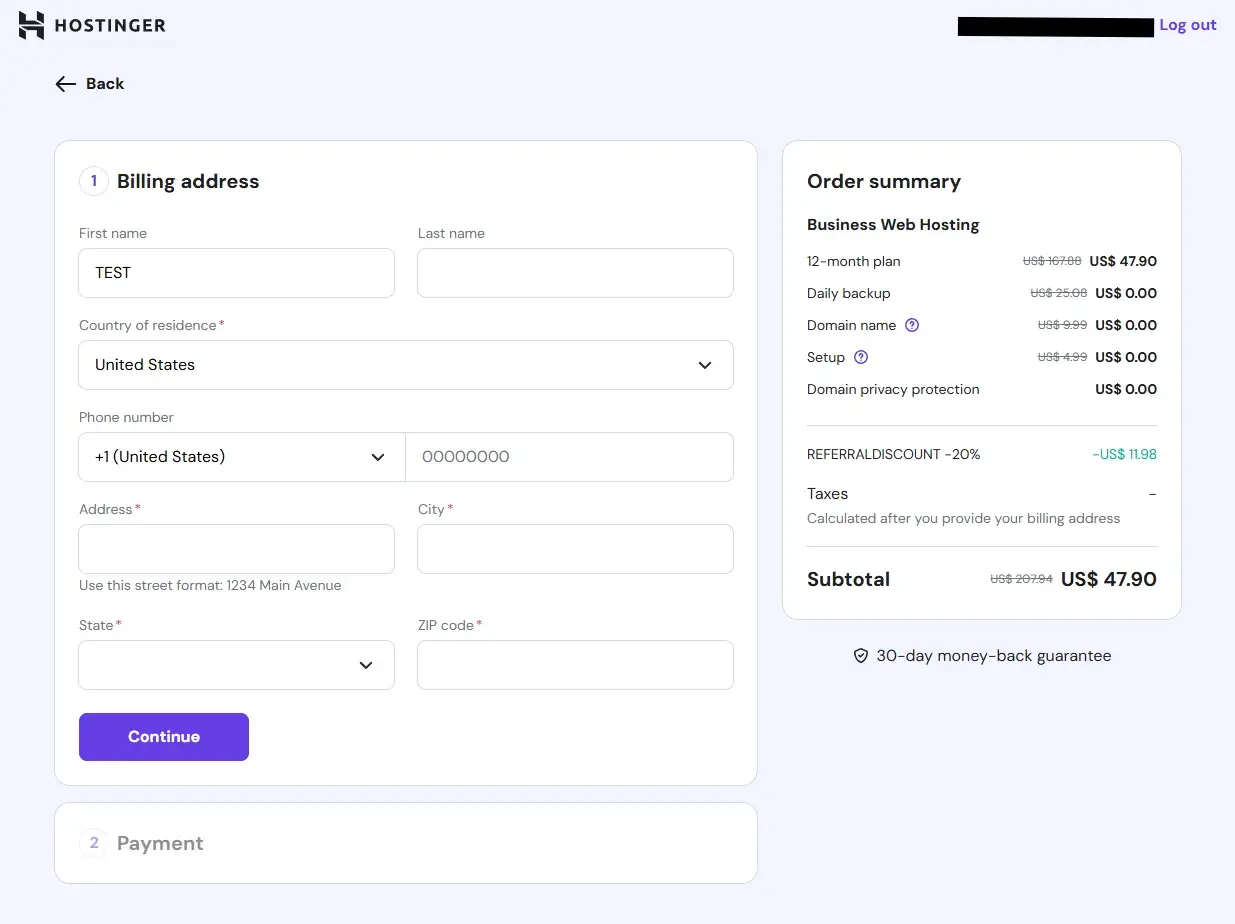
Done! Your hosting plan is ready, and you saved money without needing a code.
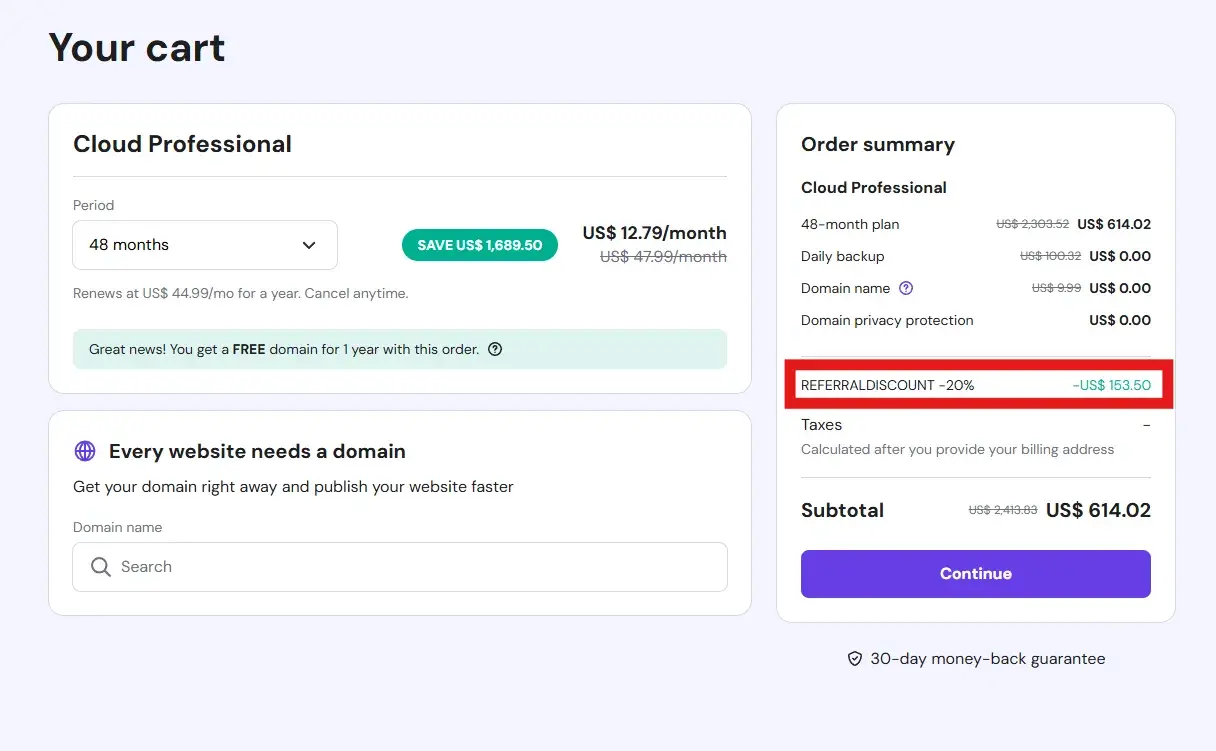
Tip For You: The 20% discount on the bigger plans give most value for example Cloud Professional.
How I can pick a hosting plan:
Web Hosting (Shared)
Best for: Beginners, blogs, portfolios, small business sites.
Why trust it: Simple setup via hPanel, solid essentials, easy to grow from here.
Who should pick this: First website or up to a couple of sites with straightforward needs.
| Plan | Websites | Storage | Mailboxes | Backups | Security & Extras |
|---|---|---|---|---|---|
| Premium | up to 25 | 25 GB SSD | 2 per site (1st year) | Weekly | Free SSL, free domain (1st year), email marketing, site migration, managed WP tools. |
| Business | up to 50 | 50 GB NVMe | 5 per site (1st year) | Daily + on-demand | Everything in Premium + CDN, WP staging, AI site tools/agent, performance boost features. |
Notes: WordPress can be installed on shared plans and gets Hostinger’s managed conveniences; Business adds more power and backups.
Managed WordPress Hosting
Best for: Anyone building specifically on WordPress.
Why trust it: Built-in speed optimizations, updates, WP tools, and an easier life.
Who should pick this: If your site is definitely WordPress and you value time savings.
| Plan | Websites | Storage | Mailboxes | Backups | WordPress-Specific Benefits |
|---|---|---|---|---|---|
| Premium WP | up to 25 | 25 GB SSD | 2 per site (1st year) | Weekly | Smart auto-updates, WP vulnerability scanner, performance optimizations, free SSL/domain year 1, migration. |
| Business WP | up to 50 | 50 GB NVMe | 5 per site (1st year) | Daily + on-demand | Adds WP staging, CDN, more resources, AI helpers for WP. |
| Cloud Startup (WP) | up to 100 | 100 GB NVMe | 10 per site (1st year) | Daily + on-demand | Cloud resources, unique IP, priority support, handles peaks better. |
Tip: If you expect traffic spikes or run multiple WP sites, the Cloud tier is the safer WP choice.
Managed WooCommerce Hosting
Best for: Online stores and eCommerce projects.
Why trust it: Optimized for WooCommerce speed, reliability, and security on top of WordPress.
Who should pick this: If your main goal is selling products with WooCommerce.
| Plan | Websites | Storage | Mailboxes | Backups | Commerce-Focused Benefits |
|---|---|---|---|---|---|
| Business (WooCommerce) | up to 50 | 50 GB NVMe | 5 per site (1st year) | Daily + on-demand | Free SSL, free domain (year 1), AI eCommerce builder, staging, object cache, CDN, managed updates. |
| Cloud Startup (WooCommerce) | up to 100 | 100 GB NVMe | 10 per site (1st year) | Daily + on-demand | All Business benefits + unique IP, priority support, better peak-traffic handling. |
Under the hood, WooCommerce hosting also leverages cloud infrastructure and LSCWP + CDN for faster stores.
Cloud Hosting
Best for: Growing sites, startups, and multi-site portfolios that need consistent performance.
Why trust it: Managed cloud environment with significantly more resources than shared, yet still easy to use.
Who should pick this: Expecting more visitors, running many sites, or want performance headroom.
| Plan | Websites | Storage | CPU | RAM | Inodes | PHP Workers | Extras |
|---|---|---|---|---|---|---|---|
| Cloud Startup | up to 100 | 100 GB NVMe | 2 cores | 3 GB | ~2,000,000 | ~100 | Unique IP, priority support, backups, CDN, managed WP tools. |
| Cloud Professional | up to 100 | 200 GB NVMe | 4 cores | 6 GB | ~3,000,000 | ~200 | Same as Startup with more power/resources. |
| Cloud Enterprise | up to 100 | 300 GB NVMe | 6 cores | 12 GB | ~4,000,000 | ~300 | Highest shared-style cloud tier for bigger workloads. |
Hostinger highlights 4× speed and up to 20× resources vs traditional web hosting on Cloud tiers.
Agency Hosting (Hostinger Pro)
Best for: Freelancers and agencies managing many client sites.
Why trust it: One dashboard, full isolation per site, access sharing, and priority support.
Who should pick this: If you manage client projects and need performance + control at scale.
| Plan | Websites | Storage | CPU | RAM | Inodes | Mailboxes | Key Agency Benefits |
|---|---|---|---|---|---|---|---|
| Agency Startup | ~100 | 300 GB NVMe | 6 cores | 12 GB | ~4,000,000 | 10 per site (1st year) | Full site isolation, access-sharing per site, unlimited CDN & SSL, dedicated IP, daily backups, managed WP/Woo, priority 24/7 support. |
| Agency Professional | ~200 | 500 GB NVMe | 8 cores | 20 GB | ~6,000,000 | 20 per site (1st year) | Same stack with more power/resources; built for bigger portfolios. |
| Agency Growth | ~300 | 700 GB NVMe | 10 cores | 30 GB | ~8,000,000 | 30 per site (1st year) | Scales to large multi-client operations; priority support and isolation preserved. |
Hostinger’s update notes emphasize isolation, performance gains, and access sharing designed for teams.
VPS Hosting (KVM)
Best for: Developers and advanced users needing root access, custom stacks, or high-traffic apps.
Why trust it: KVM virtualization with AMD EPYC CPUs, NVMe, global DCs, 1 Gbps network, backups, firewall management, and public API.
Who should pick this: If you’ll install your own software, need isolation, or run more than a typical website stack.
| Plan | vCPU | RAM | NVMe Storage | Bandwidth | Network | Common Features |
|---|---|---|---|---|---|---|
| KVM 1 | 1 | 4 GB | 50 GB | 4 TB | 1 Gbps | AMD EPYC, weekly backups, firewall mgmt, snapshots, global DCs, API, optional panels/OS templates. |
| KVM 2 | 2 | 8 GB | 100 GB | 8 TB | 1 Gbps | Same as above with more resources. |
| KVM 4 | 4 | 16 GB | 200 GB | 16 TB | 1 Gbps | Same feature set, scaled up. |
| KVM 8 | 8 | 32 GB | 400 GB | 32 TB | 1 Gbps | Highest standard KVM tier; ideal for heavier apps. |
VPS also includes quick installers for apps/distros (Docker, n8n, etc.), with DC choice near your audience.
Website Builder
Best for: Non-technical users who want a site live fast.
Why trust it: AI builder + drag-and-drop editor, modern templates, built-in marketing tools, and hosting handled for you.
Who should pick this: If you don’t want to manage WordPress/plugins and prefer an all-in-one tool.
| Plan | Websites | Mailboxes (1st year) | Domain (1st year) | Builder & Templates | AI Tools | eCommerce | Marketing & Analytics | Extras |
|---|---|---|---|---|---|---|---|---|
| Premium Website Builder | 25 | 2 per site | Free domain | AI Website Builder, 170+ templates, mobile editing | — | — | Email marketing, marketing integrations, built-in analytics | Free SSL, 24/7 support, 30-day money-back, cancel anytime |
| Business Website Builder (Most popular) | 50 | 5 per site | Free domain | Everything in Premium | AI text editor, AI image generator, AI blog post generator, AI product generator, AI logo maker, AI SEO assistant | Sell products/services, 0% transaction fees, 100+ payment methods, print-on-demand | Link-in-bio templates, email marketing, integrations, analytics | Free SSL, 24/7 priority support, 30-day money-back, cancel anytime |
Tip:
Choose Premium if you just need a sleek brochure site, portfolio, or simple blog—fast.
Choose Business if you plan to sell online or want the full suite of AI content + SEO tools built in.
You may want to read: Ahrefs vs Semrush vs Moz: Full Detailed Guide 2025
Simple Decision Guide
- Just one small site → Shared Web Hosting
- A blog or business site on WordPress → WordPress Hosting
- An online shop → WooCommerce Hosting
- Growing traffic or multiple sites → Cloud Hosting
- Full server control → VPS Hosting
- No tech skills, just want a site → Website Builder
- Manage clients’ websites → Agency Hosting
Niche categories you will also see on Hostinger
-
Minecraft / Game Server Hosting = specialized game servers.
-
n8n VPS: a prebuilt VPS for self-hosting the n8n automation platform.
Advice for picking a plan
-
Just starting / 1-2 sites? Pick Web Hosting → Premium; upgrade later if needed.
-
Committed to WordPress and want fewer tweaks? Choose Hosting for WordPress (Managed) for the extra WP conveniences.
-
Expecting traffic spikes or multiple serious projects? Cloud Hosting is a safer, faster middle ground.
-
Need root access, custom stacks, or isolation? Go VPS.
Finish checkout: and you will see your plan waiting in hPanel (Hostinger’s dashboard). To run the initial onboarding for a newly purchased plan, go to Home in hPanel → Account actions → Setup. That kicks off Hostinger’s guided setup so the environment is ready.
Run the onboarding and add your first website
When you hit Setup on your plan in hPanel, Hostinger walks you through: creating or migrating a site, attaching a domain, and basic configuration. It’s deliberately streamlined so you can complete it in minutes. If there are any pending payments, that area shows them so you can clear everything and proceed.
If you don’t have a domain yet
You can grab your free domain right away during setup. If you’re not ready, you can also start with a temporary domain and connect your real one later. Hostinger’s setup wizard will guide you super flexible.
If you already own a domain
You can attach it during onboarding. If your domain is registered with Hostinger but under a different Hostinger account, you may be asked to verify ownership the wizard will prompt you.
Upload or build your website
Adding your domain as a website
1. Once you’ve claimed or connected your domain, go to your Hostinger control panel (hPanel).
2. Click on Websites → Create or Add Website.
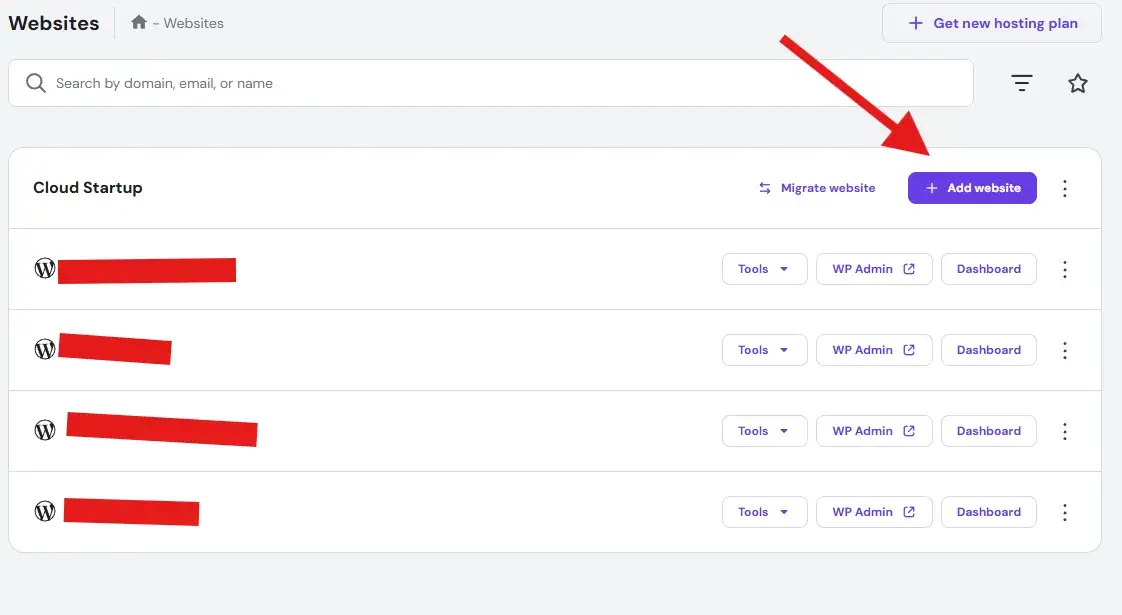
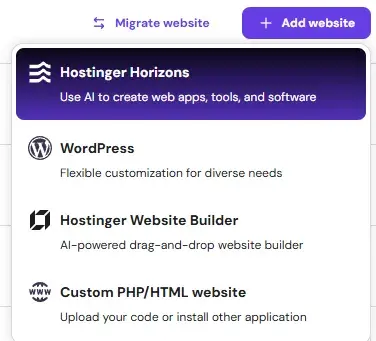
2.1. Choose Platform:
- Hostinger Horizons
- WordPress (For me i always choose WordPress)
- Hostinger Website Bulider
- Blank Custom PHP/HTML
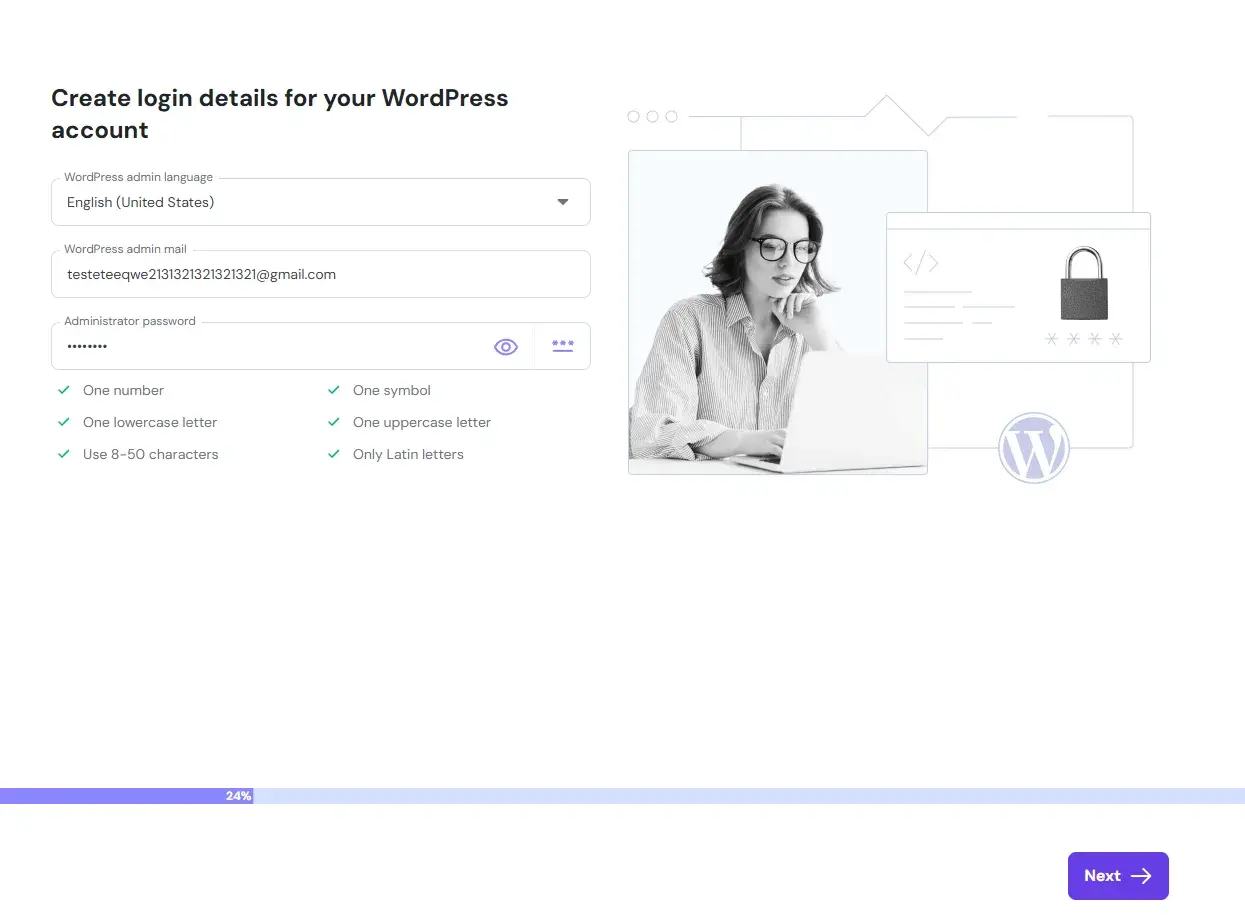
3. Create login details for your WordPress account then click next
4. Choose how you’d like to build your website
- Pre-built websites and themes
- Build a website from scratch, with the help of pre-built websites or themes.
- Blank Site (i choose this also to start fresh WordPress install)
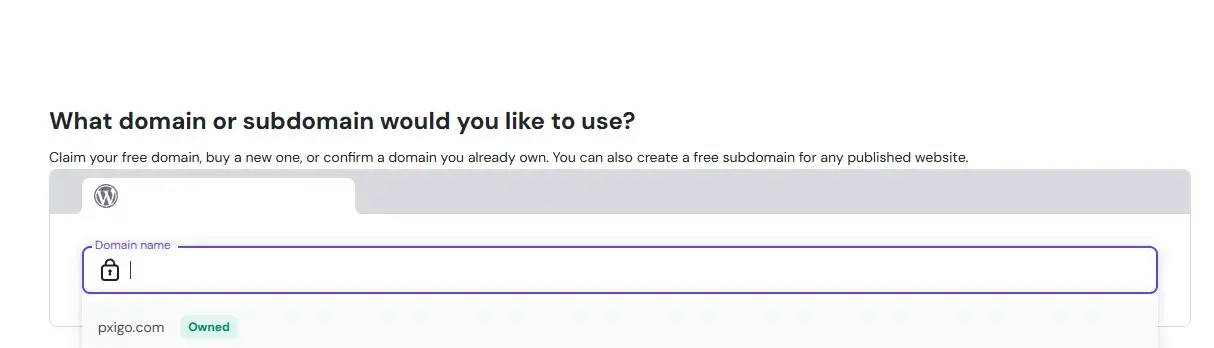
5. Choose your domain from the list.
That’s it your new website is live with your free domain.
Pro tips while you build
-
Install a cache/optimization plugin for WordPress sites.
-
Keep themes and plugins updated.
You may want to read: How to download and install WordPress themes Step-By-Step
How to Do:
Get the free email mailbox (with a Hostinger hosting plan)
1. Log in to Hostinger → open hPanel
Go to your Hostinger account and open hPanel (the Hostinger control panel).
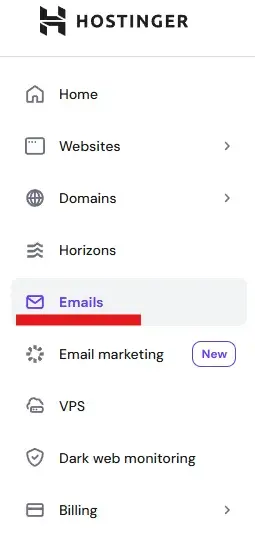
2. Open the Emails section
In hPanel’s left menu click Emails. That page lists domains on your account and any included mailboxes.
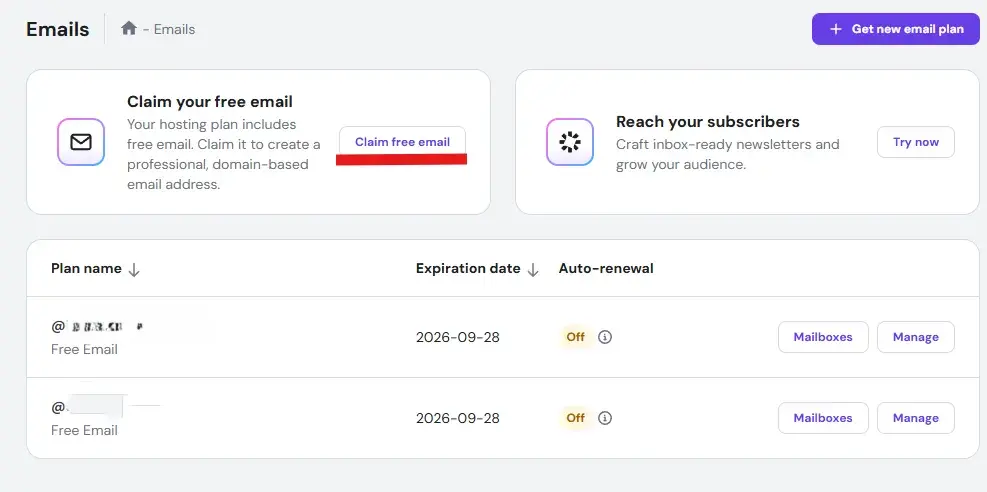
3. Claim the free email / Create a mailbox
If your hosting plan includes a free mailbox you may see a Claim free email or similar button — click it. Or click Create mailbox / Get new email plan and select free email.
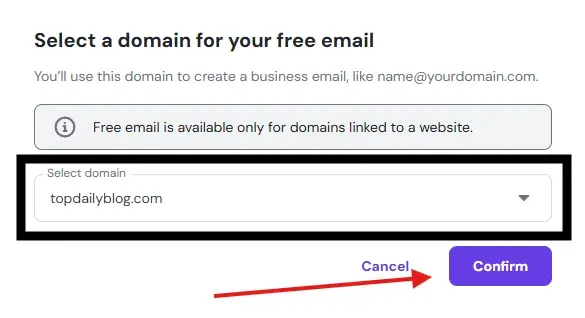
4. Select A domain you want the free email on then click Confirm.
5. Select Email Plan You Want Or The Free Plan
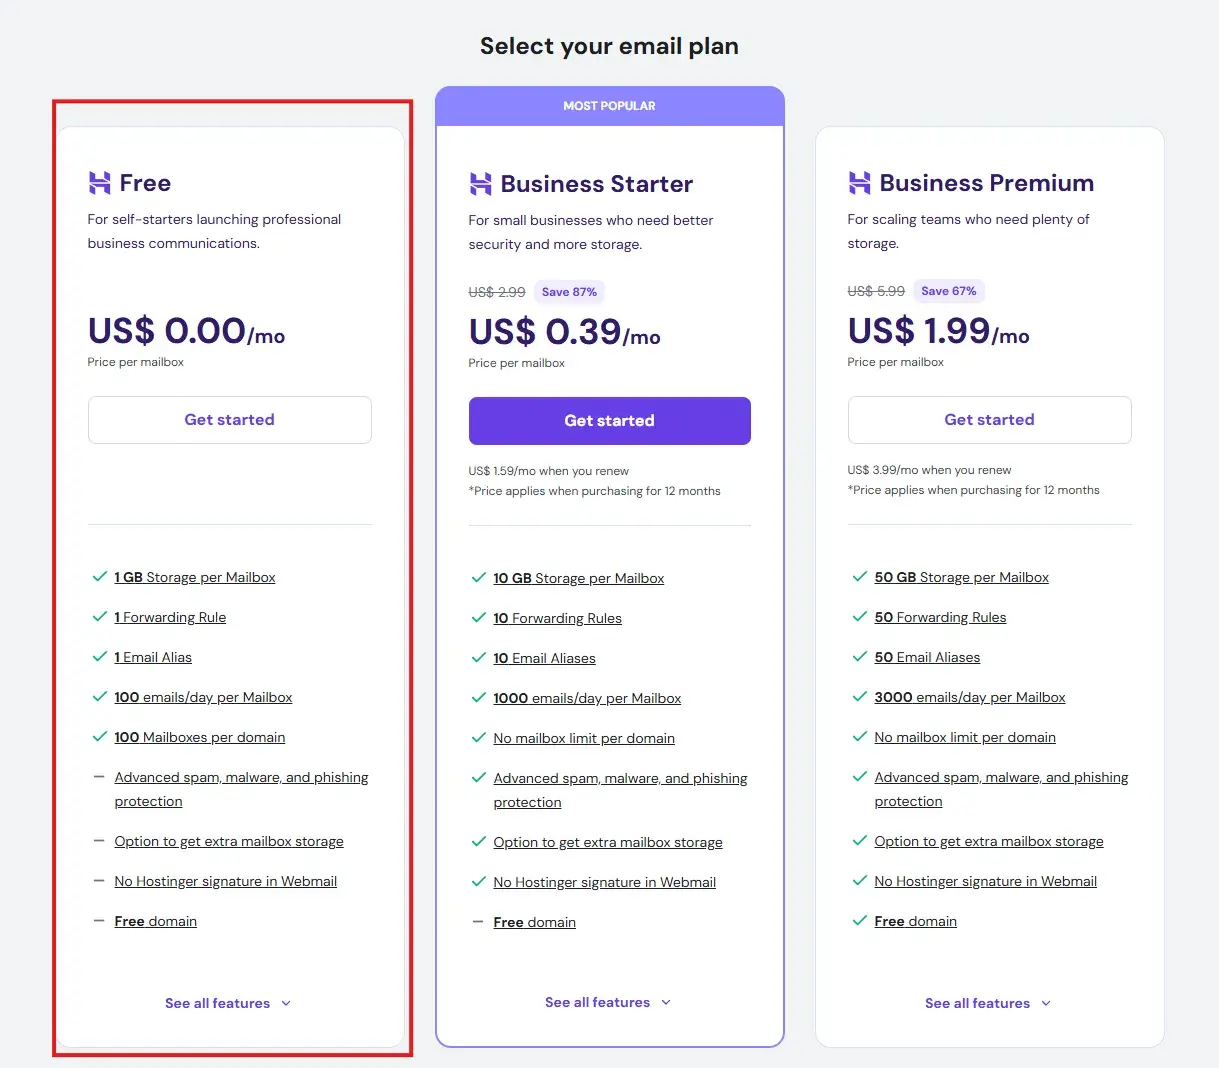
if you want to go for the paid plans take the discount with you ITS FREE!
6. Enter the local part (e.g., info → gives info@yourdomain.com) and set a secure password. Optionally choose mailbox quota if prompted. Then create.
-
Access webmail or connect an email client
-
You can open webmail from hPanel (or go to Hostinger’s webmail URL).
-
To use Gmail/Outlook/Apple Mail, grab the manual configuration (IMAP/POP/SMTP) from hPanel → Manage mailbox → Connect Apps & Devices. Typical Hostinger settings:
IMAP (incoming):imap.hostinger.comport 993 (SSL).
POP3 (incoming):pop.hostinger.comport 995 (SSL).
SMTP (outgoing):smtp.hostinger.comport 465 (SSL) or 587 (TLS).
Use your full email (name@domain.tld) and the mailbox password.
-
-
Test sending / receiving
Send a test email to/from a personal account to confirm DNS propagation and client settings are good. If domain DNS is not pointing to Hostinger yet, you’ll need to add MX records (see below).
Set up professional email (MX, SPF, DKIM, DMARC)
If your domain’s nameservers point to Hostinger, email DNS is handled automatically for Hostinger Email. If your DNS is not at Hostinger (Option B above), you’ll set records manually:
-
In hPanel go to Emails → Manage (for your domain) → Connect Domain.
-
You’ll see the exact values you need to add at your DNS provider, grouped by purpose:
-
MX (receiving mail): two MX records.
-
SPF (TXT): authorizes Hostinger to send on your behalf.
-
DKIM (CNAME): cryptographic signatures that improve deliverability.
-
DMARC (TXT): optional but highly recommended for phishing protection and sender reputation.
Hostinger’s manual configuration guide lays this out clearly and shows where to find the precise values for your account.
-
-
After adding the records at your DNS host, allow up to 24 hours for DNS propagation before expecting everything to work perfectly.
Deliverability tips
-
Start with SPF + DKIM at minimum; then add DMARC with a relaxed policy (
p=none) to monitor, and tighten over time. -
Avoid sudden blasts from a brand-new domain; warm up sending.
Host multiple domains/websites on one account
If you plan to run more than one website, check your plan level:
-
Premium plans and above allow hosting multiple websites on a single account.
-
Each site needs its own domain name (you can always purchase or connect domains later).
-
In hPanel: Websites → Create or migrate a website, then follow the steps for a new or existing site.
Hostinger’s knowledge base confirms eligibility and the workflow, and notes that Single Web Hosting can only host one website (upgrade if you need more).
Don’t forget DNS
For any domain purchased elsewhere, you’ll still point its DNS to Hostinger (nameservers or A record) before it resolves to your new site.
You may want to read: How to download and install WordPress plugins Step-By-Step
Point a domain to a VPS
If/when you move a project to VPS for more control, pointing a domain is straightforward:
-
Option 1 (A records):
-
Find your VPS IP.
-
In the domain’s DNS Zone, delete existing
@/wwwA/AAAA/CNAME that could conflict. -
Add two records:
-
@→ VPS IP (A) -
www→ VPS IP (A)
-
-
-
Option 2 (A + CNAME):
-
@→ VPS IP (A) -
www→ your domain (CNAME toexample.com)
-
-
If your domain is purchased elsewhere, Hostinger can assign custom nameservers in hPanel to verify ownership when connecting through the VPS DNS Manager.
These exact options and steps (including which records to delete and add) are documented in Hostinger’s VPS domain-pointing guide.
Point your domain to Hostinger
Your website won’t live at yourdomain.com until DNS is set. Hostinger supports two reliable methods:
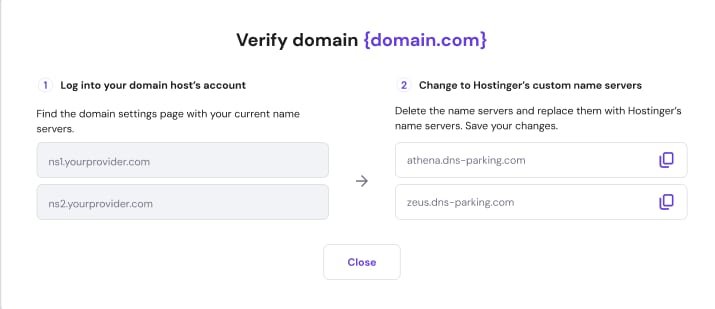
Way A: Change nameservers (manage DNS at Hostinger)
-
Update your domain’s nameservers at your registrar to the exact values shown in your hPanel.
-
This is the best fit if you want Hostinger to manage your DNS (and you plan to use Hostinger Email).
-
After propagation, manage DNS in Hostinger’s DNS Zone Editor.
Way B: Point with an A record
-
Keep DNS with your current provider (e.g., Cloudflare, registrar) and set A records for the root (
@) andwwwto the IP Hostinger shows you. -
Existing email DNS stays unchanged (handy if you already use another email provider).
Where to click in hPanel
Go to Websites → find your site → if you see “Temporary domain” or “Domain not connected”, click Check guide. Hostinger then shows you the exact nameserver values or A record IP to use. Always copy the values shown in your panel they can vary by account/domain.
Propagation time
DNS changes can take a few hours (up to ~24 hours) to propagate globally. During this window the site may appear inconsistent, which is normal. You can still access your site via the temporary domain in the meantime.
How to Confirm plan and site details (IP, limits, nameservers)
The most convenient place to see your plan’s essentials is Plan Details in hPanel:
-
Go to Websites → Dashboard (next to your website).
-
In the left sidebar: Hosting plan → Plan Details.
-
There you’ll find:
-
Website Details: (your domain and site IP address).
-
Hosting Details: (plan limits, and a quick “upgrade” path).
-
Nameservers: both what’s currently on your domain and Hostinger’s recommended values.
Hostinger’s help center spells out the location and content of the Plan Details page.
-
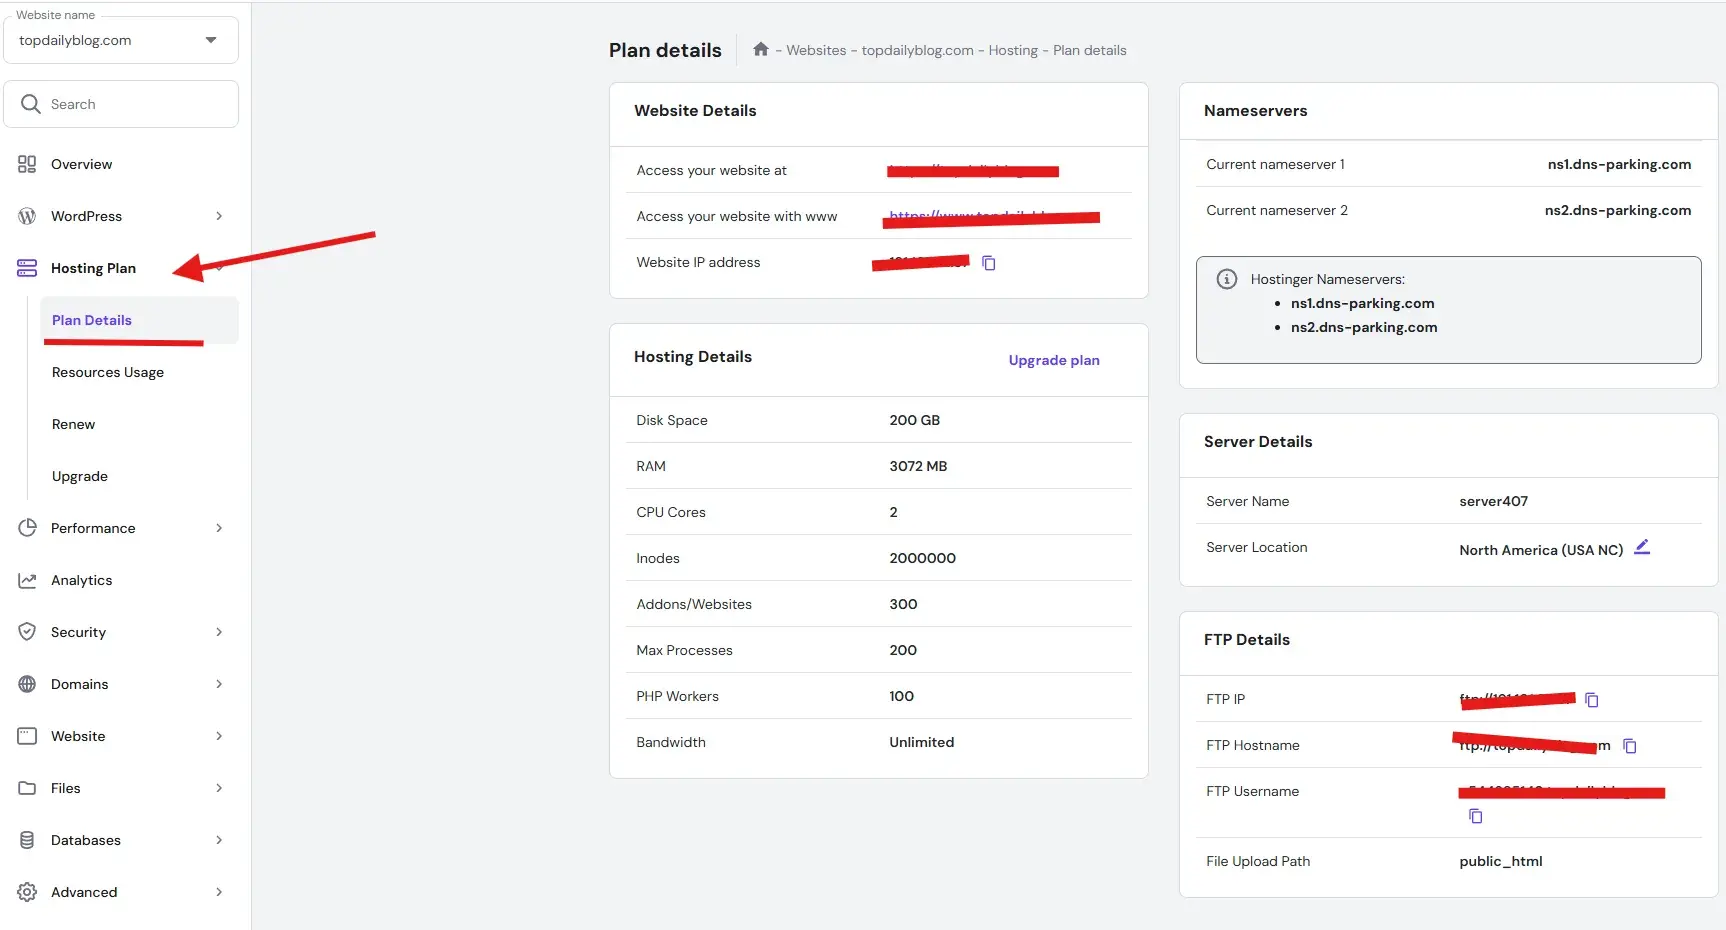
Knowing this page well saves time later you’ll return here for the IP when adding A records, or to confirm your nameservers.
Frequently asked setup questions
Q1) How long does domain pointing take?
Most changes show within a few hours but can take up to 24 hours worldwide. This is normal DNS propagation behavior; use your temporary domain while you wait.
Q2) Where do I find my site’s IP and plan limits?
Open Websites → Dashboard → Hosting plan → Plan Details to see Website Details (domain + IP), Hosting Details (limits, upgrade), and Nameservers.
Q3) Do I have to move my DNS to Hostinger?
No. You can keep DNS at your registrar/Cloudflare and just add A records to the IP Hostinger provides. If you want Hostinger to handle Email automatically, nameservers are simpler.
Q4) Can I start without a domain?
Yes use a temporary domain during setup and point your real domain later.
Q5) What if email isn’t delivering?
Confirm MX (receiving), SPF (TXT, sending), and DKIM (CNAME) are exactly set. Add DMARC for better protection/visibility. Give DNS up to 24 hours after any changes.
Q6) When should I move to VPS?
When you need root-level control, advanced stacks, or isolation for heavier apps. Hostinger’s VPS flow includes clear guidance for pointing your domains to the VPS when you’re ready.
Troubleshooting that saves hours
My domain still doesn’t load my site.
-
Verify you used the exact nameservers or A record IP from hPanel.
-
Clear old/conflicting DNS entries (
@,www, stray AAAA/CNAME). -
Check status with global DNS tools, then give it more time if records are correct.
- The most common reason is that the SSL certificate hasn’t finished installing. Give it up to 1-3 hours to fully propagate.
Email sends but lands in spam.
-
Confirm SPF and DKIM match Hostinger’s values exactly.
-
Add DMARC with a monitoring policy first (e.g.,
p=none) and tighten later.
I can’t find my site’s IP for A records.
-
hPanel → Websites → Dashboard → Hosting plan → Plan Details → Website Details (the IP is right there).
Trying to host a second site but the option isn’t there.
-
Check your plan. Premium and above can host multiple websites; otherwise, upgrade.
Migrating from another host?
-
Use Hostinger’s guided migration tool and then point the domain once files are live. (The domain-pointing steps are the same as above.)
Smart setup tips for 2025
-
Pick a plan you won’t outgrow in 3 months. If you know you’ll add a second site soon, start at Premium or higher so you can host multiple domains immediately.
-
Centralize DNS when possible. Nameservers at Hostinger make email and site records simpler to manage in one place handy if you don’t need Cloudflare features. If you do love Cloudflare, then go A-record and finish Email records manually.
-
Document everything. Paste your IP, nameservers, and login notes in a private doc these are the three things you’ll look up again and again. (Hostinger’s Plan Details page is the single source of truth.)
-
Email authentication first, marketing later. Before any newsletter or outreach, make sure MX, SPF, DKIM, DMARC are in place; this alone prevents most first-week headaches.
-
VPS? Plan DNS early. When you’re ready to scale to VPS, expect to re-aim DNS (A/CNAME). Use maintenance windows if traffic is sensitive.
Where things live in hPanel
-
Home → Account actions: find the Setup button to initialize a new plan.
-
Websites → Dashboard → Hosting plan → Plan Details: see domain, IP, limits, nameservers in one view.
-
Websites → (list): if you see Temporary domain / Domain not connected, click Check guide for tailored instructions.
-
Emails → Manage → Connect Domain: copy your MX, SPF, DKIM, DMARC values if your DNS is elsewhere.
End-to-end example
-
Buy Premium Web Hosting so you can run a blog and a small portfolio on separate domains.
-
Hit Setup in hPanel to initialize the environment.
-
Choose Create a new website, install WordPress with a starter theme.
-
Attach your primary domain during onboarding. If you bought it outside Hostinger, decide:
-
Nameservers → manage DNS at Hostinger (easier if you’ll use Hostinger Email).
-
A record → keep DNS at registrar/Cloudflare and just point to Hostinger IP.
-
-
Open Plan Details to grab the IP (for A records) or confirm nameservers (if going that route).
-
While DNS propagates, finish your theme setup and content on the temporary domain.
-
Configure Email:
-
If DNS at Hostinger: done automatically.
-
If DNS elsewhere: add MX, SPF, DKIM, DMARC exactly as shown in Emails → Connect Domain. Wait up to 24 hours. Test sending/receiving.
-
-
Add a second website for your portfolio via Websites → Create or migrate a website and repeat DNS steps for its domain.
-
When traffic grows, consider a VPS and repoint your domains via A records (and possibly a
wwwCNAME). Remove conflicting records first.
Discount Guaranteed 20%
Here’s how to apply the 20% Guaranteed Discount cleanly:
-
Use the discount button/link (above) before you complete checkout.
-
Confirm you see the discount reflected on the Hostinger checkout summary before payment.
-
If you finished purchase already, you can still follow all steps in this guide; just keep the discount button handy for colleagues or your next plan/upgrade.
If you run into anything odd, the pointers above take you to the exact Hostinger screens and record types to verify, and the cited guides keep you aligned with Hostinger’s latest recommendations:
-
Plan setup via hPanel onboarding (where to click “Setup”).
-
Domain pointing (nameservers or A record) + propagation window.
-
Hosting a site: the five big steps & decision tips.
-
Email DNS (MX, SPF, DKIM, DMARC) and where to copy your exact values.
-
Multiple websites eligibility and flow.
-
Pointing domains to a VPS (records to add and what to remove).
-
Finding your plan details (IP, limits, nameservers) in one place.